๐ŸŒ Global Mirror โ€” Visit original CN site โ†’
Skip to main content

Opik Overview

With Comet Opik, debug, evaluate, and monitor your LLM applications, RAG systems, and agentic workflows with comprehensive tracing, automated evaluations, and production-ready dashboards.
Opik agent monitoring example with CrewAI

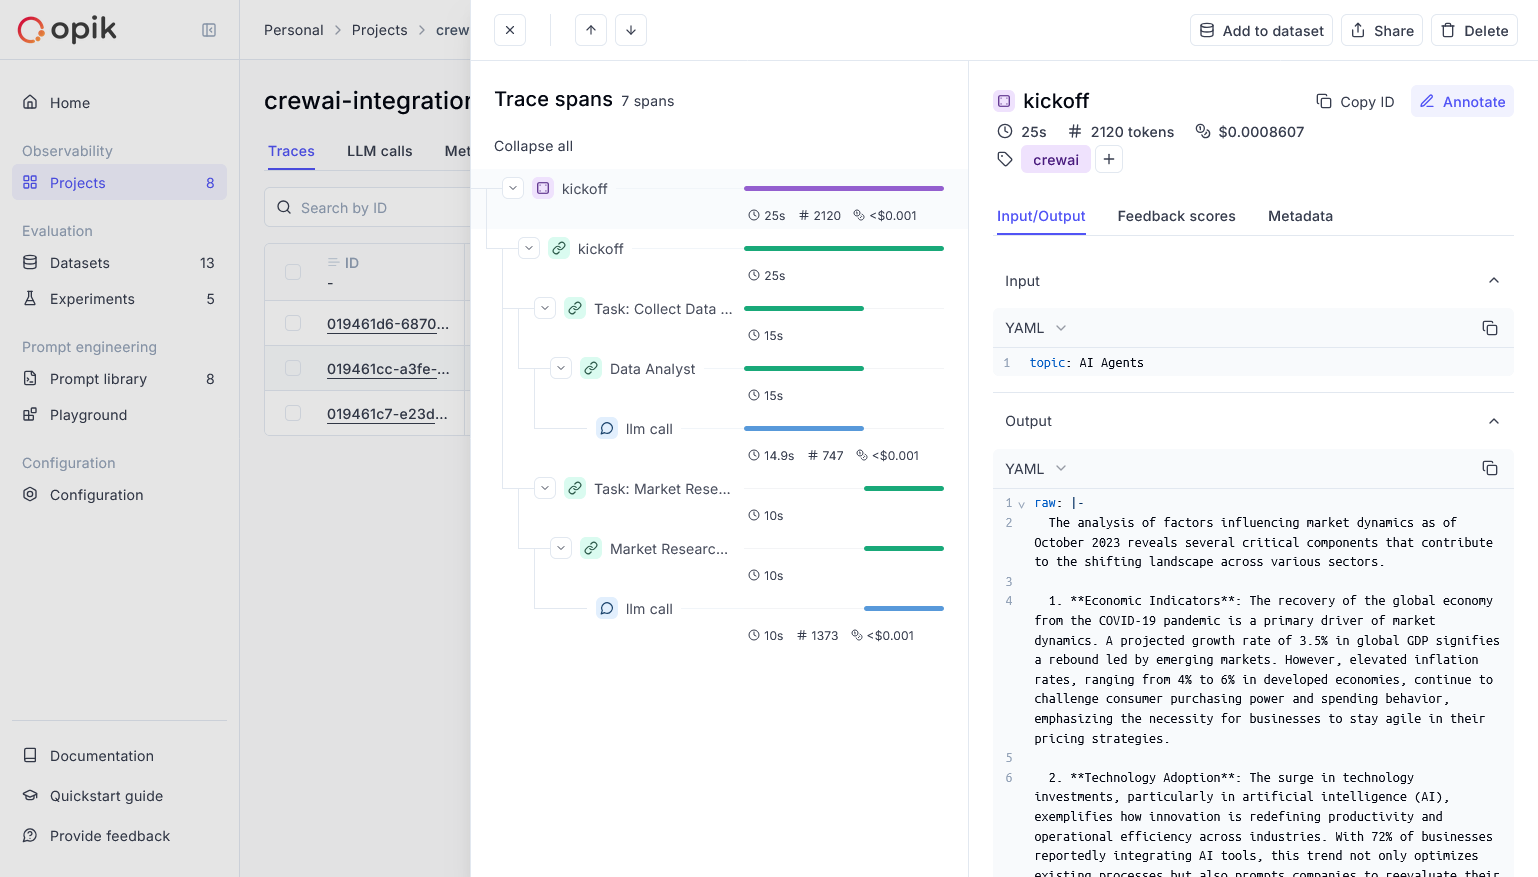
Opik Agent Dashboard

Opik provides comprehensive support for every stage of your CrewAI application development:
  • Log Traces and Spans: Automatically track LLM calls and application logic to debug and analyze development and production systems. Manually or programmatically annotate, view, and compare responses across projects.
  • Evaluate Your LLM Applicationโ€™s Performance: Evaluate against a custom test set and run built-in evaluation metrics or define your own metrics in the SDK or UI.
  • Test Within Your CI/CD Pipeline: Establish reliable performance baselines with Opikโ€™s LLM unit tests, built on PyTest. Run online evaluations for continuous monitoring in production.
  • Monitor & Analyze Production Data: Understand your modelsโ€™ performance on unseen data in production and generate datasets for new dev iterations.

Setup

Comet provides a hosted version of the Opik platform, or you can run the platform locally. To use the hosted version, simply create a free Comet account and grab you API Key. To run the Opik platform locally, see our installation guide for more information. For this guide we will use CrewAIโ€™s quickstart example.
1

Install required packages

pip install crewai crewai-tools opik --upgrade
2

Configure Opik

import opik
opik.configure(use_local=False)
3

Prepare environment

First, we set up our API keys for our LLM-provider as environment variables:
import os
import getpass

if "OPENAI_API_KEY" not in os.environ:
os.environ["OPENAI_API_KEY"] = getpass.getpass("Enter your OpenAI API key: ")
4

Using CrewAI

The first step is to create our project. We will use an example from CrewAIโ€™s documentation:
from crewai import Agent, Crew, Task, Process


class YourCrewName:
    def agent_one(self) -> Agent:
        return Agent(
            role="Data Analyst",
            goal="Analyze data trends in the market",
            backstory="An experienced data analyst with a background in economics",
            verbose=True,
        )

    def agent_two(self) -> Agent:
        return Agent(
            role="Market Researcher",
            goal="Gather information on market dynamics",
            backstory="A diligent researcher with a keen eye for detail",
            verbose=True,
        )

    def task_one(self) -> Task:
        return Task(
            name="Collect Data Task",
            description="Collect recent market data and identify trends.",
            expected_output="A report summarizing key trends in the market.",
            agent=self.agent_one(),
        )

    def task_two(self) -> Task:
        return Task(
            name="Market Research Task",
            description="Research factors affecting market dynamics.",
            expected_output="An analysis of factors influencing the market.",
            agent=self.agent_two(),
        )

    def crew(self) -> Crew:
        return Crew(
            agents=[self.agent_one(), self.agent_two()],
            tasks=[self.task_one(), self.task_two()],
            process=Process.sequential,
            verbose=True,
        )

Now we can import Opikโ€™s tracker and run our crew:
from opik.integrations.crewai import track_crewai

track_crewai(project_name="crewai-integration-demo")

my_crew = YourCrewName().crew()
result = my_crew.kickoff()

print(result)
After running your CrewAI application, visit the Opik app to view:
  • LLM traces, spans, and their metadata
  • Agent interactions and task execution flow
  • Performance metrics like latency and token usage
  • Evaluation metrics (built-in or custom)

Resources

Opik agent monitoring example with CrewAI